Getting started
Render Station makes photoreal product shots in your browser. You bring a 3D model, light it like a studio photographer would, and the lab renders it with a path tracer: light bounces around the scene the way it does in real life, so reflections, soft shadows and glass come out right.
Everything runs on your own graphics card. Your models are opened and rendered on your computer and are never uploaded, unless you choose to save a project to the cloud.
What you need
- A computer with a graphics card made in the last few years. A laptop works; a dedicated GPU (NVIDIA RTX, AMD Radeon) is faster.
- Chrome or Edge on Windows or macOS (the lab needs WebGPU). Firefox and Safari work only where they offer WebGPU.
- A 3D model of your product. If you do not have one at hand, use the start scene or File → Templates….
On a phone the lab opens a viewer for your saved renders and projects instead of the 3D studio.
Your first render in two minutes
- Open a model. Drag a file onto the viewport, or press Open model in the Model tab. The lab reads
.glb,.gltf,.obj,.fbx,.stland CAD files (.step,.stp,.iges). The model is scaled to 30 cm and set on the floor, like a product on a tabletop. - Find the angle. Drag with the left mouse button to turn around the product, use the wheel to zoom and drag with the right button to move sideways. Frame model in the Model tab brings the whole product back into view.
- Light it. Open the Light tab, or the Lighting and HDRI shelves under the viewport, and pick a look. See Light.
- Let it render. The picture starts grainy and gets cleaner with every sample. The counter at the top shows how far it is, for example
24 / 32. - Switch to Final in the top bar when you like the shot. Final renders bigger, with more samples, and cleans the last grain with the denoiser.
- Save PNG. The button in the top bar saves exactly what you see, at the output size of the render.
Tip: stay in Draft while you set up the shot: it answers quickly. Switch to Final only for the picture you keep.
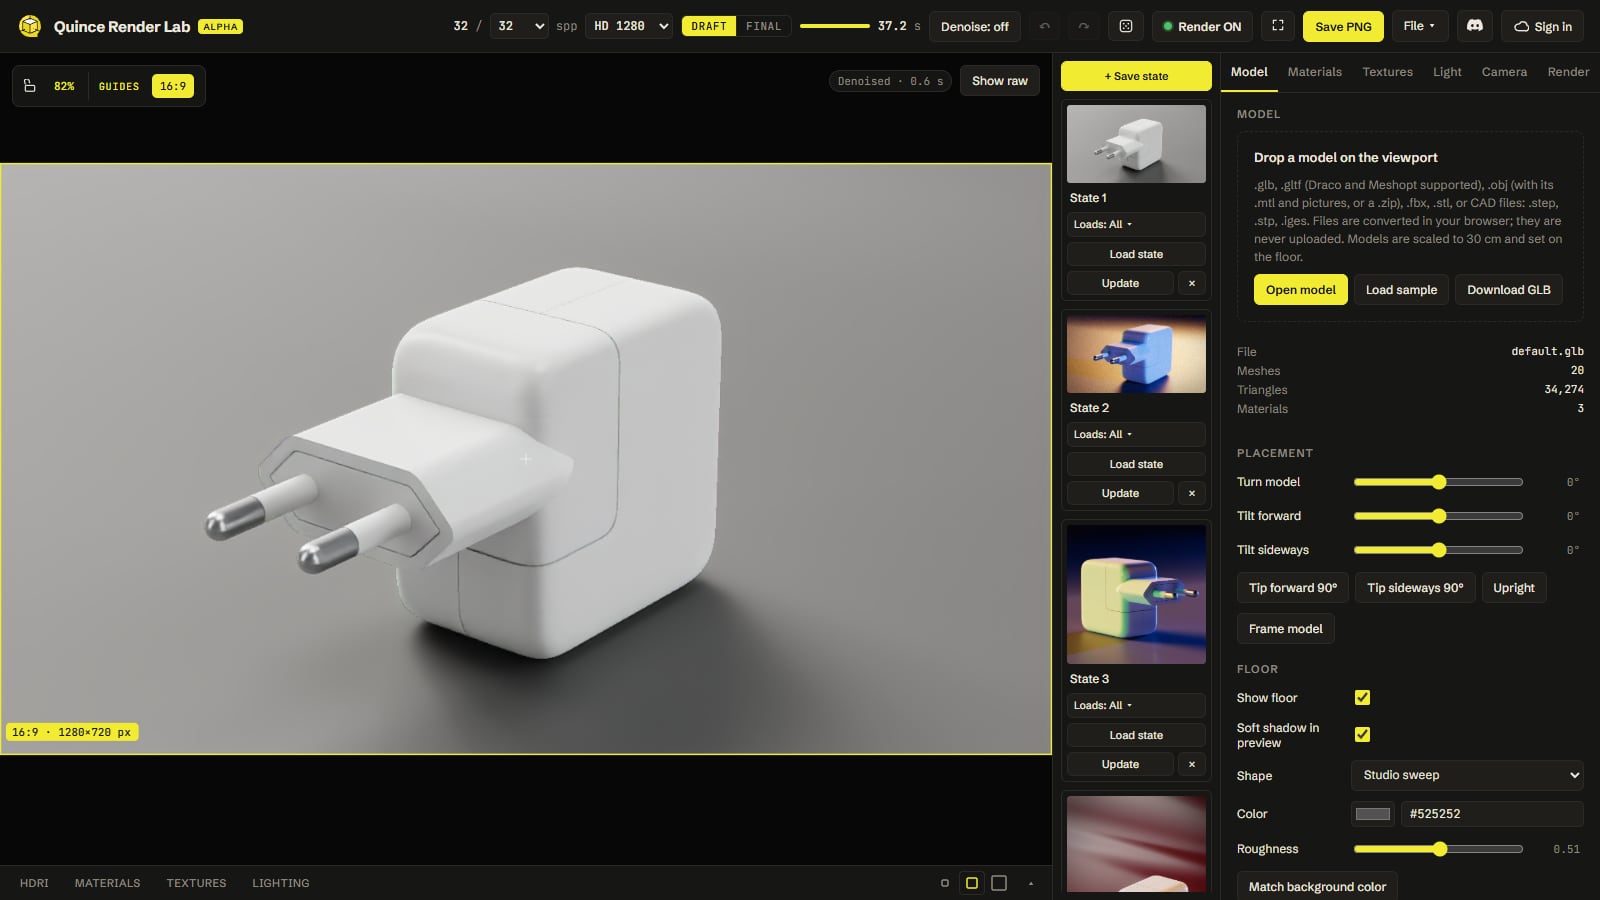
The screen at a glance
| Area | What it is for |
|---|---|
| Top bar | Samples, output size, Draft / Final, the denoiser, undo and redo, the render meter and the pause button, full screen, Save PNG, the File menu and your account |
| Viewport | The render. The bar in its top-left corner holds the view lock, the zoom and the crop guides |
| States (list in the sidebar, under the render numbers) | Saved looks of the scene: camera, light, background and materials. Click one to bring it back |
| Panels (right) | Model, Materials, Textures, Light, Camera and Render |
| Shelves (under the viewport) | Ready-made HDRIs, materials and lighting setups to apply with one click |
Rendering and Paused
At the right of the top bar two elements show and control the render. The meter shows the progress (37% and the time while rendering, Done and the time when the sample target is reached, Paused with the progress or with edits when changes are waiting). The pause button (key P) switches auto-render off and on. While it is paused the viewport shows a fast preview, so you can still move the camera, change materials and set up the shot without the graphics card working at full speed; your changes are remembered, and the button, which says Resume after an interrupted render and Render when nothing has been rendered yet, renders them. The first time you open the lab, rendering is paused until you press Render. Save PNG turns orange when the render is done.
The very first render on a computer compiles the path tracing program for your graphics card. That can take from a few seconds to a minute; the viewport says how long it has taken so far. It happens once per visit.
Keeping your work
- Save as state (on the Current card at the top of the States list in the sidebar) keeps the current camera, light, background and materials, so you can try something else and come back.
- File → Save to file writes a
.qprojfile with the model, your edits and the states. Open it again with File → Open project file…. - Sign in to save projects to the cloud, keep your renders in a gallery and share them with a link.
Model
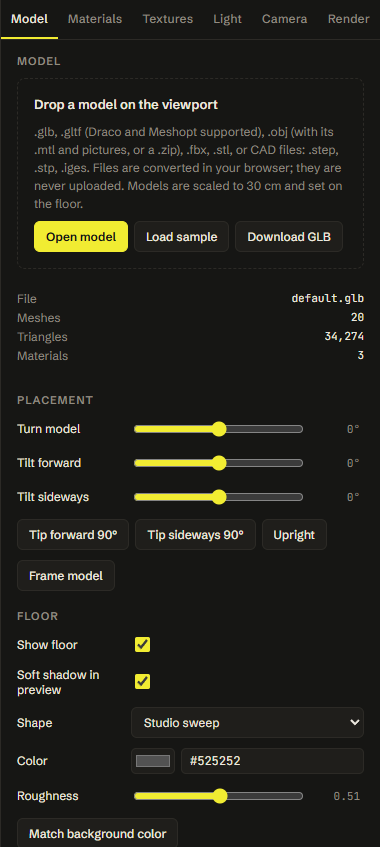
The Model tab loads your product, places it on the floor and sets up the floor itself.
Opening a model
Drag a file onto the viewport, or press Open model. The lab reads:
| Kind | Files |
|---|---|
| glTF | .glb, .gltf (with Draco and Meshopt compression) |
| OBJ | .obj together with its .mtl file and pictures, or all of them in one .zip |
| Other meshes | .fbx, .stl |
| CAD | .step, .stp, .iges |
Files are converted in your browser and never uploaded. CAD files are turned into a mesh on your computer; a large assembly can take a while. While a model, a CAD file, an HDRI or a project loads, the viewport shows what is happening: for a CAD file three steps (Read file, Make triangles, Place on floor) with the time that has passed, for other files a bar with the percent. Cancel stops it and keeps the previous scene as it was. If the file cannot be read, the viewport says why; Keep current model goes back to the scene you had, Open another file lets you choose a different file. While something loads, Render, Save PNG and the quality controls in the top bar wait; the side panels stay usable.
Every model is scaled to 30 cm across and set on the floor in the middle, like a product on a tabletop. This keeps depth of field and lighting believable whatever units the file was made in. Download GLB gives the model back at its original size.
Load sample puts the built-in perfume bottle on the floor, to try materials and light without a file of your own.
Under the buttons, the tab shows the file name and how many meshes, triangles and materials the model has.
Tip: for CAD files from SolidWorks, Fusion, Creo or similar, export STEP (
.step/.stp). It keeps the parts apart, so you can give each one its own material.
Placement
- Turn model turns the product around its vertical axis. It is the quickest way to show another side without moving the camera and the light.
- Tilt forward and Tilt sideways lean it. A model that arrives lying on its side (CAD files are often drawn seen from above) is stood up with Tip forward 90° or Tip sideways 90°. Upright goes back to the way the file had it.
- After a turn or a tilt the model is centered again and put back on the floor.
- Frame model moves the camera so the whole product fills the frame.
The turn and the tilt are kept in states, in project files, and in the GLB you download.
Floor
- Show floor switches the floor on and off.
- Shape: Studio sweep is a floor that curves up into a back wall without a visible edge, like the paper roll of a photo studio. Flat plane is a plain floor.
- Color and Roughness set its look: a low roughness makes a glossy floor with a reflection of the product, a high roughness a matte one.
- Metalness, Specular, Clearcoat, Coat roughness, Sheen, Transmission, IOR and Glow work like the same settings of a material (see Materials): a metallic floor, a lacquered one with a clearcoat, a floor that glows. They are saved with states, under Background & floor, and are part of Download GLB when the floor is included.
- Match background color gives the floor the color of the background, so the two blend into one.
- Soft shadow in preview draws a soft shadow under the product in the fast preview (while rendering is off or the camera moves). The render itself always has its real shadow.
Animated models
If the file carries an animation, an animation player appears in the bar under the viewport, between the library tabs and the icon sizes: play and pause (Space), a loop button, a scrubber to pick a frame (click or drag it, or use the arrow keys: one frame, with Shift ten), the frame and time, and the clip when the file has several. The bookmark button Save this frame as a state keeps the chosen frame together with the rest of the look as a new state. The render uses the frame that is on screen.
Download GLB
Download GLB saves the model with your material edits as a .glb file at its original size, turned and tilted as in the lab. Before the download you can add:
- Floor: the studio sweep (or the flat floor) as a mesh with its material, under the model.
- Lights: the softboxes of the studio rig as directional lights, aimed at the model (an approximation of the rig). With an HDRI there are no lights to write: an HDRI lights through the environment.
- Environment map: a GLB cannot carry one, so it is saved as an
.hdrfile next to the GLB. Your browser may ask to allow two downloads.
Materials
The Materials tab changes what each part of the product is made of: its color, how glossy it is, whether it is metal, glass or a glowing screen. Every change shows in the render right away.
Choosing a material
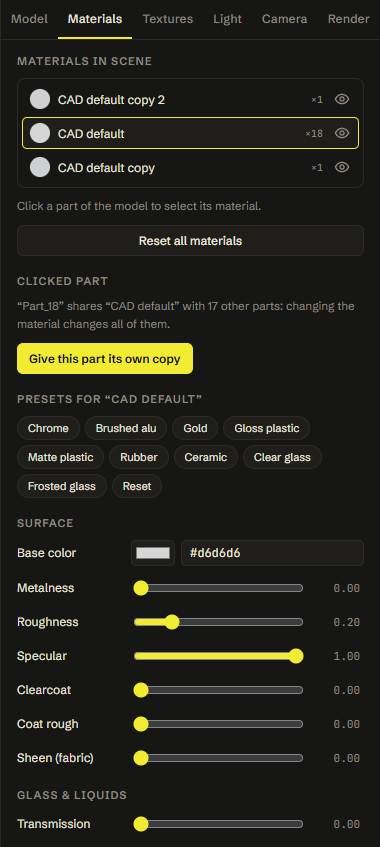
- Click a part of the model in the viewport to select its material. The tab opens on it.
- Or click a material in the Materials in scene list at the top of the tab.
- Shift-click more parts (or more materials in the list) to choose several and edit them together.
- Double-click a name in the list to rename it.
- The eye next to a material hides every part that uses it, for example a cover that hides what is inside.
Parts often share one material. When the part you clicked shares its material with others, the tab says so, and Give this part its own copy splits it off so you can change it alone. A copy that no part uses any more is dropped when you save; the shield next to it keeps it anyway.
To use a material on another part, drag it from the list onto that part in the viewport.
Presets
The Presets row applies a ready-made finish to the selected material in one click: Chrome, Brushed alu, Gold, Gloss plastic, Matte plastic, Rubber, Ceramic, Clear glass and Frosted glass. Reset puts this material back the way the file had it. Reset all materials at the bottom does that for every material (Ctrl+Z takes it back).
Surface
| Setting | What it does |
|---|---|
| Base color | The color of the surface. For metals it is also the color of the reflections |
| Use texture | Shown when the file has a color picture (a label, a wood grain): switches it on and off |
| Metalness | 0 for plastic, paint, wood and anything that is not metal; 1 for metal. Values in between are rarely right |
| Roughness | 0 is a mirror finish, 1 completely matte. Most products sit between 0.2 and 0.6 |
| Specular | How strongly a non-metal reflects. Leave it at the default unless a surface looks too shiny or too dull |
| Clearcoat | A clear lacquer layer on top, like car paint or a varnished surface |
| Coat rough | How glossy that clear layer is |
| Sheen (fabric) | The soft glow at the edges of cloth and velvet |
Double-click a slider (or its number) to put it back to the value the file had.
Glass and liquids
| Setting | What it does |
|---|---|
| Transmission | How much light goes through. 1 for glass, water and clear plastic |
| IOR | How strongly the material bends light: about 1.33 for water, 1.5 for glass and most plastics, 2.4 for diamond |
| Thickness | How thick the walls are, in centimetres. It changes how strongly the glass bends what is behind it |
| Tint color | The color light takes on inside the material, like amber glass or a colored liquid |
| Tint depth | How far light travels before it has the full tint color. Short depth: strong color; none: clear |
| Opacity | Makes the surface see-through without any glass effect, for example a fading decal. For real glass use Transmission |
Tip: glass needs light passing through it several times. If clear parts look dark or speckled, raise Glass bounces in the Render tab.
Emission
Glow color and Glow strength make a material give off light: a screen, an LED, an indicator light. Strength 1 glows softly; values up to 30 light up the parts around it. With Bloom and Emissive glow in the Render tab the glow also spreads into a halo.
The Materials shelf
The Materials shelf under the viewport holds ready-made materials, each shown on a pair of balls:
- Click a card to apply it to the selected material, or drag it onto a part of the model.
- PBR materials come with their own texture maps (wood, leather, fabric, metal finishes…).
- Load your material reads a set of PBR pictures (base color, normal, roughness…) or a
.zipof them. - Drag a material from the Materials in scene list onto the shelf to keep it as one of yours. Your materials are kept in this browser; rename them with the pencil and delete them with the ×.
Textures
The Textures tab works with the pictures on a material: a label, a wood grain, a brushed metal pattern, the small bumps of a plastic. It sets how the pictures lie on the product, and shows the maps of the selected material so you can replace them.
Select a part of the model first (a plain click). The tab then lists the maps of its material.
Mapping
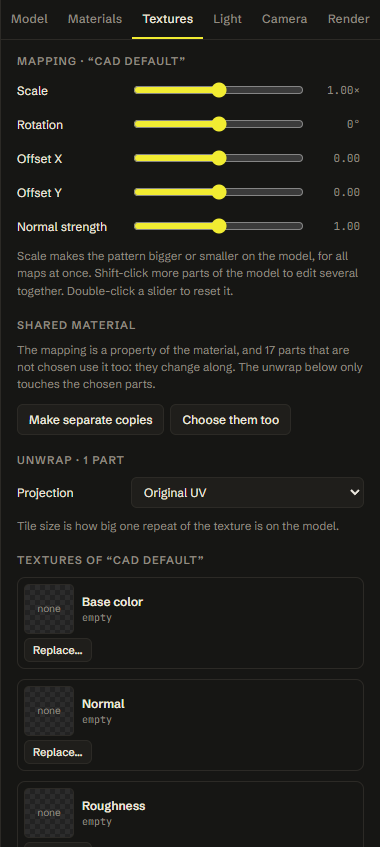
Mapping moves the pattern on the model, for all the maps of the material at once:
- Scale makes the pattern bigger or smaller.
- Rotation turns it.
- Offset X and Offset Y slide it.
- Normal strength makes the bumps of the normal map deeper or flatter.
The mapping belongs to the material. If parts you did not choose use the same material, the tab says so and offers Make separate copies, so that only the chosen parts change, or Choose them too to include them.
Shift-click more parts to edit several together. A slider without a handle means the chosen parts differ; move it to give them all the same value. Double-click a slider to reset it.
Unwrap
A texture needs a way to lie on the surface (its UV coordinates). Many CAD models have none, or bad ones, and a texture then looks smeared or stretched. Unwrap gives the chosen parts new coordinates from their shape:
| Projection | Best for |
|---|---|
| Original UV | The coordinates from the file (when they are good) |
| Box | Most shapes: the pattern is projected from six sides |
| Planar | Flat parts, a lid, a front panel: projected from one direction (Looks along X, Y or Z) |
| Cylindrical | Bottles, cans, handles: wrapped around an Axis |
| Spherical | Round shapes |
Tile size is how big one repeat of the texture is on the model, in centimetres, so a wood grain or a fabric has the same scale on every part.
Texture maps
Each map has a slot. Click Replace… or drop a picture onto a slot; Remove takes it off and Reset brings back the one from the file. Click a thumbnail to see the map full size.
| Slot | What the picture sets |
|---|---|
| Base color | The colors of the surface: labels, prints, wood, fabric |
| Normal | Small bumps and grooves that catch the light, without changing the shape |
| Roughness | Where the surface is glossy and where it is matte (dark is glossy, light is matte) |
| Metalness | Where the surface is metal |
| Ambient occlusion | Darkening in creases and corners |
| Emissive | Where the surface glows, and in which color |
| Opacity | Where the surface is see-through (cut-outs, decals) |
| Clearcoat | Where the clear lacquer layer is |
| Transmission | Where light passes through |
Base color and Emissive are read as color pictures, the others as data. Roughness is read from the green channel and metalness from the blue one, so a plain grey picture works for both. A GLB that packs occlusion, roughness and metalness into one picture shares it between those slots until you replace one.
Light
Light makes a product shot. The lab lights the scene with an environment: a picture of light all around the product, the way a photo studio surrounds it with softboxes and reflectors. You choose the environment in the Light tab, or with one click from the HDRI and Lighting shelves under the viewport.
Lighting
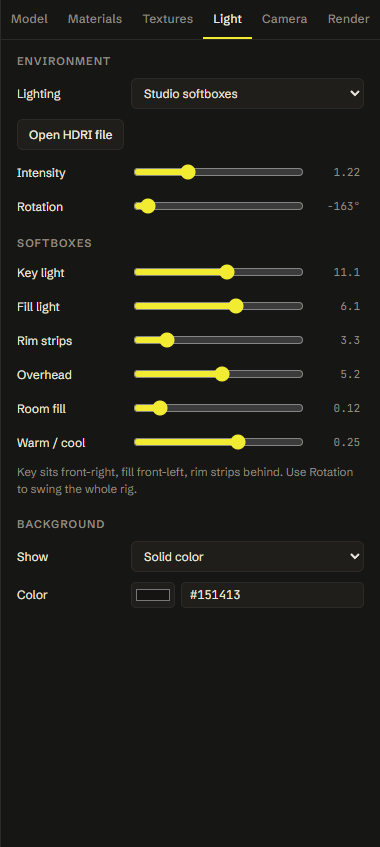
The Lighting menu at the top of the Light tab sets the kind of environment.
| Choice | What you get |
|---|---|
| Studio softboxes | A product photo studio built into the lab: a key light, a fill light, two rim strips, an overhead light and room fill, each with its own slider. The best start for most products |
| Overcast dome | Soft, even light from all around, like a cloudy sky. Few reflections, very gentle shadows |
| Sky gradient | A light blue sky above a dark ground, for outdoor-looking shots |
| Your HDRI (.hdr / .exr) | A real panorama of light that you open from a file. See HDRI |
Intensity makes the whole environment brighter or darker. Rotation turns it around the product, so the reflections and the highlights move without moving the camera. Double-click a slider to put it back to its default.
Studio softboxes
With Studio softboxes chosen, the Softboxes group sets each light on its own:
- Key light: the main light, front-right of the product. It gives the shape and the brightest highlights.
- Fill light: front-left, softer. It opens up the shadow side.
- Rim strips: two tall strips behind the product. They draw a bright line along its edges and separate it from the background.
- Overhead: a large light from above, for top surfaces and a soft shadow under the product.
- Room fill: a little light from everywhere, so nothing goes completely black.
- Warm / cool: shifts the color of the light towards warm (orange) or cool (blue).
Use Rotation to swing the whole rig at once, for example to move the key light to the other side.
Tip: glossy and metal products show the lights as reflections. Turn Rotation slowly and watch the highlights slide along the product until they draw its shape.
HDRI
An HDRI is a 360° photo with the real brightness of every light in it. It gives the most natural reflections.
- The HDRI shelf under the viewport has studio HDRIs ready to use, each shown as a pair of balls lit by it. Click one to light the scene with it. The first cards open an HDRI file of your own and put the built-in softboxes back.
- Open HDRI file in the Light tab (or Load your HDRI on the shelf) opens your own
.hdror.exrfile; you can also drop it onto the viewport. It is added to the shelf as one of yours and kept in this browser, so it is there next time. Removing it from the shelf does not touch the file on your computer.
Lighting presets
The Lighting shelf under the viewport keeps whole lighting setups: the environment, its intensity and rotation and every softbox slider. A preset changes the light only; the camera, the background and the materials stay as they are, so it works on any shot.
- Click a card to apply it.
- Save current light keeps your current light as a new preset in this browser. Use the × on one of yours to delete it.
Lights in the model
Some model files bring their own lights, for example the bulb of a lamp. When they do, the Lights in the model group lists them. Switch each one on or off and set its Intensity; 100% is the value the file has.
Background
The Background group sets what is seen behind the product. It does not change the light.
| Show | What you get |
|---|---|
| Solid color | A plain color of your choice behind the product. The floor still catches the light and the shadow |
| Environment | The environment itself, as in a photo. Blur softens it so the product stands out |
| Transparent (PNG alpha) | No background: the saved PNG has a transparent background, ready to place on a website or in a layout |
With Transparent, Floor shadow keeps a soft shadow under the product in the PNG, as semi-transparent black, whatever the light in the scene is. Shadow strength sets how dark it is and Shadow blur how soft. The shadow is worked out when the render is finished, with two quick extra renders of the floor.
Camera
The Camera tab works like the lens and the viewfinder of a real camera: the focal length, the depth of field and the shape of the picture.
Moving the camera
In the viewport:
- Drag with the left mouse button to turn around the product.
- Turn the mouse wheel to come closer or go back.
- Drag with the right mouse button to move the view sideways.
- Frame model (here and in the Model tab) brings the whole product back into the frame.
- The view cube appears in the top right corner of the viewport when the pointer is over it, and turns with the camera. Point at a side, an edge or a corner to light it up; the name of the view shows below the cube. Click a side (Front, Right, Top, Back, Left, Bottom) for that view, an edge for the 45° view between two sides, a corner for a three-quarter view. The camera swings there in less than half a second, keeping its distance and the point it turns around. Drag the cube to turn around the product, as in the viewport. Three buttons show next to it: turn the view 90° left or right, and Home (key H), which does the same as Frame model. The floor limits how low the camera can go, so Bottom ends at the lowest angle. The cube is never in the saved picture. You can use it while a render is running; a new angle starts the render again.
Every camera move starts the render again. While you move, the viewport shows a fast preview; the render continues when the camera is still.
Lens
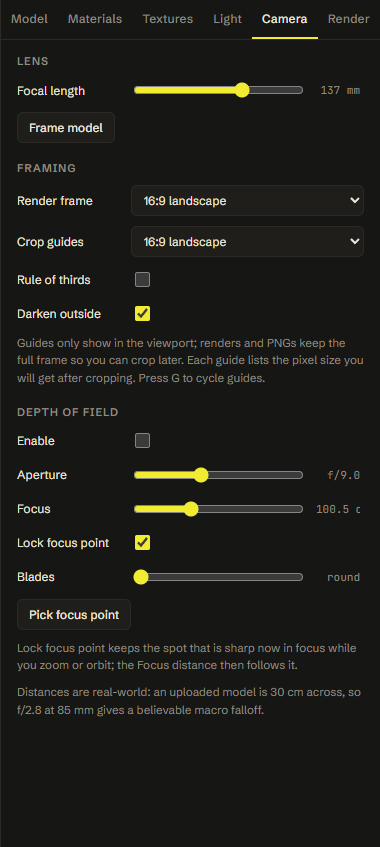
Focal length works like the lens of a camera, from 18 mm (wide) to 200 mm (long). Product photographers mostly use 50 to 135 mm: the longer the lens, the flatter the perspective and the less distorted the product looks. A wide lens close to the product exaggerates its shape.
Depth of field
Depth of field keeps one plane of the product sharp and blurs what is in front and behind, as with a real camera. It is off at first; Enable turns it on.
- Aperture is the f-stop, from f/0.7 to f/22. A small number (f/1.4, f/2.8) gives a shallow, strongly blurred background; a large one (f/11, f/16) keeps more of the product sharp.
- Focus is the distance to the sharp plane. Double-click it to focus on the point the camera turns around.
- Pick focus point: click it, then click a spot on the model. That spot becomes sharp.
- Lock focus point keeps the spot that is sharp now in focus while you zoom or turn the camera; the Focus distance follows it.
- Blades is the number of aperture blades. It sets the shape of out-of-focus highlights (bokeh): round with 0, polygons with 5 to 9.
Distances are real: a model is 30 cm across, so f/2.8 at 85 mm gives the believable soft falloff of a macro product shot.
Framing
- Render frame is the shape of the picture: 16:9 landscape, 4:3, 1:1 square, 4:5 portrait, 9:16 vertical, or Fill window. The frame sits in the middle of the viewport, outlined by a thin line with an orange corner at each corner, and a small tag in its bottom left corner tells its shape and size in pixels, and the output size in the Render tab follows its shape.
- Crop guides draw where a crop of the picture would fall, for the shapes social media and websites use: 16:9, 1:1, 4:5, 9:16, or All at once. Each guide shows the pixel size you will get after cropping.
- Rule of thirds draws the lines that divide the picture in thirds, inside the crop guide when one is chosen.
- Darken outside shades what lies outside the guide.
Guides only show in the viewport: renders and PNGs always keep the full frame, so you can crop later. Press G to show or hide the guides (the rule of thirds). The crop guides are picked in the frame menu of the bar in the viewport.
The bar in the viewport
The small bar in the top-left corner of the viewport has:
- The padlock (Lock view): the camera stays put and the mouse wheel magnifies the picture instead, to check details up close. Drag to move around the magnified picture, double-click to go back to the whole frame. Ctrl + wheel does the same without locking. The render is not affected.
- The zoom (for example
82%): how big the render is shown compared with its own pixels; 100% is one render pixel per screen pixel. The arrow next to it goes back to the whole frame. - Guides shows or hides the rule of thirds.
- The frame shape (for example
4:5): opens a menu with the render frame and the crop guides.
States
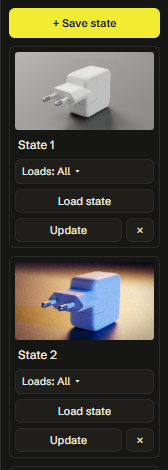
A state is a saved look of the scene: the camera angle, the light, the background, the materials and more. Save a few while you work, and you can jump between them with one click, compare them, and come back to the one the client liked.
The States strip sits between the viewport and the panels.
Saving and using states
- The Current card at the top of the strip is always there and shows what is on screen now. Save as state keeps it as a new state with a thumbnail; the new state goes first in the list, under the Current card.
- Click a thumbnail (or Load state) to bring that look back.
- Update replaces the state with what is on screen now.
- × deletes it. Shift+click the × to skip the question.
- Click the name to rename a state, and drag a card (or the grip at its top right) to change the order. From the keyboard, focus a card, press Space to lift it, Up/Down to move it, Space to drop it, Esc to cancel. Current and Unsaved work stay first.
- Sort… in the header puts the saved states in order once: newest or oldest first, by name, or by format (frame shape). You can still drag them afterwards.
States are kept with the project: in a .qproj file and in a cloud project. The start scene of the lab comes with a few to try.
What a state brings back
Under each state, Loads: All ▾ chooses which parts of it come back when you click it. Untick the ones you want to keep as they are now:
| Part | What it covers |
|---|---|
| Camera | The angle, position and focus, the lens and the depth of field |
| Light | The lighting, its HDRI, intensity and rotation, and the lights of the model |
| Background & floor | Background color, blur, transparency and the floor |
| Materials | All material edits |
| Model turn, tilt & frame | How the model is turned and tilted, and the frame of an animation |
| Frame & guides | The render frame and the crop guides |
| Color & effects | Tone mapping, exposure, bloom, vignette and grain |
For example, a state that loads only Light works as a lighting preset for this project: it changes the light and keeps your camera angle. One that loads only Camera jumps to a saved angle and keeps the current light.
The Unsaved state
When you bring back a state while the scene on screen has changes that are in no state, the lab keeps them first as an Unsaved state at the top of the strip. Clicking a state never loses your work: click the Unsaved state to get it back. Ctrl+Z also undoes the click on a state, camera included.
Render
The render starts grainy and gets cleaner with every sample: one more pass of light through the scene. It stops by itself at the sample target. Moving the camera or changing the scene starts it again from the first sample.
The settings that matter most are in the top bar. The Render tab has all of them.

Draft and Final
Draft and Final in the top bar switch the quality with one click.
| Draft | Final | |
|---|---|---|
| Samples | 8 | 64 |
| Output width | 1920 px | 1920 px |
| Bounces / glass bounces | 4 / 4 | 8 / 8 |
| Denoiser | on | on |
| Upscale (FSR) | Balanced · 67% | Off |
Draft answers quickly while you set up the shot. Final is for the picture you keep. Each mode remembers its own values: change the samples or the size while Final is on, and Final brings those back next time.
Every model, project or template you open starts in Draft. Press Final when the shot is ready.
Samples
The samples menu in the top bar (or Stop at in the Render tab) sets when the render stops. More samples mean less grain and a longer render. With the denoiser, 64 to 256 samples are usually enough; without it, a clean image may need 512 or more. Never stop keeps refining until you change something.
The counter shows the samples done and the target, for example 40 / 64, with the time it has taken next to the progress bar.
Output size
The size menu in the top bar (or Output size in the Render tab) sets the width of the picture in pixels: HD 1280, Full HD 1920, 2K, 4K, 5K or 8K. The height follows the frame shape chosen in the Camera tab (16:9, 4:5, 1:1…). Custom size… in the Render tab lets you type a width or a height.
A bigger image takes longer per sample and needs more memory. The lab renders at most about 13 megapixels: 4K fits, while 5K and 8K at 16:9 are lowered to fit, and the line under the menu shows the size you really get.
Upscale (FSR)
Upscale (FSR) in the Render tab lets the lab trace the picture at a smaller size and scale it up to the output size with AMD FidelityFX Super Resolution. A smaller picture converges much faster: on a test scene, a denoised Full HD Draft took 3.4 s without it and 1.7 s at Balanced · 67% (Fast · 50% took 1.4 s). The choices are Off, Quality · 77%, Balanced · 67% and Fast · 50%.
Draft uses Balanced; Final keeps it off, so the picture you save is traced at its full size. Fine detail (small text, thin lines) can look slightly softer at 50%.
Bounces
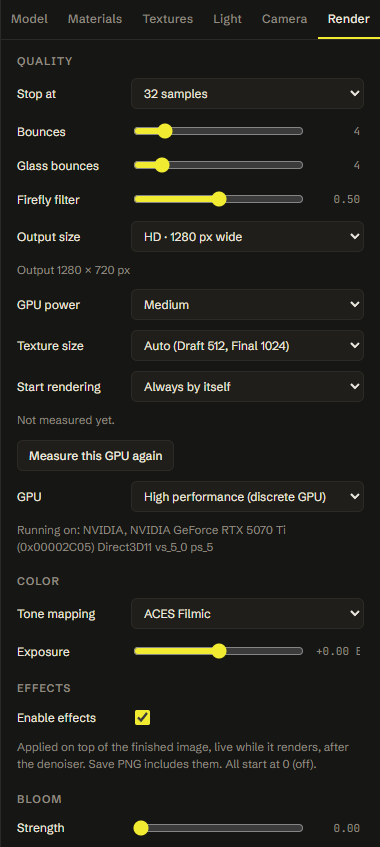
- Bounces: how many times light may bounce from surface to surface. More bounces brighten corners and the inside of open shapes. 4 to 8 is plenty for most products.
- Glass bounces: how many times light may pass through glass, liquid and other clear materials. Too few leave clear parts dark or speckled with black dots; use 8 or more for bottles and glassware.
- Firefly filter: removes the single very bright pixels ("fireflies") that sharp reflections of small lights can leave. Higher filters more, but can dull very sharp highlights.
Color
- Tone mapping turns the light of the render into the colors of the screen. ACES Filmic gives a film-like look with rich contrast and is a good default. AgX keeps bright colors more natural and is gentler on saturated products. Khronos Neutral keeps product colors closest to their real values. None (linear) applies no curve.
- Exposure brightens or darkens the image in photographic stops (EV), like the exposure of a camera.
Changing these does not restart the render.
Curves
Curves, under Exposure, work like the curves of Blender's color management: a square where the horizontal axis is how bright a pixel is now and the vertical axis is how bright it becomes. A straight diagonal changes nothing.
- Enable curves switches them on and off without losing the shape. Whether they are on is saved with states and projects.
- C (combined) changes all colors together. Pull the middle up to brighten midtones, or make an S shape for more contrast.
- R, G and B change one color on its own, for tints (a blue curve pulled down warms the picture). Each is applied after C.
- Click the curve to add a point, drag a point to move it, double-click (or right-click) a point to remove it. The two end points only move up and down.
- Preset… starts from Contrast, Strong contrast, Brighten midtones, Darken midtones, Lift shadows or Faded blacks (this resets the R, G and B curves). Reset brings back the straight lines.
The curves are applied to the finished picture, after tone mapping and the denoiser, and are included in Save PNG. They are drawn live and never restart the render. They work with Enable effects off, and are saved with states and projects. The picture keeps 16 bits a channel until the curves are applied, so even a steep curve does not turn a smooth gradient, like a studio background, into visible bands; a very fine noise (one step of brightness) hides the steps of the 8-bit screen and PNG.
Speed and your graphics card
- GPU chooses which graphics card the browser is asked for, on computers that have two (a laptop with built-in and NVIDIA or AMD graphics, say). High performance asks for the faster card. The change takes effect after a reload, and the line below shows the card the lab is really running on.
The lab uses the slower graphics card? Windows decides for the whole browser. Open Settings → System → Display → Graphics, find Chrome or Edge, set it to High performance, and restart the browser.
Denoiser
The denoiser (Intel Open Image Denoise) removes the last grain from a finished render in a second or two. It runs by itself when the render reaches its sample target, if Auto denoise is on, or when you press Denoise now. The Denoise button in the top bar switches Auto denoise on and off. Both Draft and Final have it on by default.
- Quality: Fast uses the small network, Balanced the full one; Balanced keeps a little more fine detail and takes longer; it is the default, and templates open with it.
- Albedo + normals: two extra guide pictures of the colors and the shape of the product. They keep edges, labels and textures sharp. Leave it on.
The Denoised / Raw switch in the top-right corner of the viewport compares the two; holding the D key shows the raw picture until you let go. The switch is hidden while Denoise is off. Save PNG saves the one on screen and says which it is.
Effects and watermark
Both are in the Render tab. They go on top of the finished picture, after the denoiser, and they are part of the PNG you save. They never touch the render itself, so changing them does not start it again.
Effects
Enable effects switches them all on and off at once, to compare. Every effect starts at 0 (off).
| Effect | Settings | What it does |
|---|---|---|
| Bloom | Strength, Threshold, Radius | A soft glow around the brightest parts of the picture, like light spreading in a camera lens. Threshold sets how bright a part must be to glow, Radius how far the glow spreads |
| Emissive glow | Makes glowing materials (screens, LEDs) glow in proportion to their Glow strength, whatever the threshold | |
| Chromatic aberration | Amount | The thin color fringes a real lens leaves at the edges of the picture |
| Vignette | Amount, Softness | Darkens the corners to lead the eye to the product |
| Grain | Amount, Size | Film grain, for a photographic look |
Tip: a little goes a long way. A touch of vignette and a little bloom on the highlights make a render look photographed; strong values make it look processed.
Watermark
A logo and a line of text in a corner of every PNG you save.
- Choose logo… loads your logo: a PNG with a transparent background, or an SVG. Remove takes it off.
- Show watermark switches it on and off without losing it.
- Corner: bottom right, bottom left, top right or top left.
- Size, Margin and Opacity of the logo. Size and margin are a share of the picture width, so the watermark looks the same at every output size.
- Text line, Text size and Text color add a line of text, for example a copyright or a website.
The watermark is kept with the project.
Saving your work
There are three things to keep: the picture (a PNG), the scene (a project file or a cloud project) and, if you need it, the model with your materials (a GLB).
Save PNG
Save PNG in the top bar opens the picture as it will be saved, at the output size of the render, with the effects and the watermark. The line under it says the size, the number of samples and whether it is the raw or the denoised picture.
- Download PNG saves it on your computer.
- Save to project (when a cloud project is open) adds it to the project's render gallery. See Projects and sharing.
- Embed the render settings in the PNG writes every setting of the shot inside the PNG file: light, camera, background, floor, effects, render and all material values. The picture looks the same; the settings travel with it. include the model file name adds the name of the model file too. Leave it off for files that should not reveal a client's file names.
Save PNG saves what is on screen: wait until the render has finished and, in Final, until the denoiser has run. Crop guides are never part of the picture.
Project files (.qproj)
A .qproj file keeps the whole scene on your computer: the model, every material edit and replaced texture, your own HDRI, the light, the camera, the states and the render settings. It is the way to keep work without an account, to move it to another computer, or to send it to a colleague.
| File menu | What it does |
|---|---|
| New file (Ctrl+N) | Starts over with the start scene (the page reloads; it asks first if there are unsaved changes) |
| Templates… | Ready-made scenes to start from |
| Open project file… (Ctrl+O) | Opens a .qproj file. You can also drop one onto the window |
| Save to file | Saves the scene to its file, or asks for a name the first time |
| Save to file as… (Ctrl+Shift+S) | Saves a copy under a new name |
| Recent files | The files you opened or saved lately (Chrome and Edge) |
The bottom of the File menu shows the file the scene belongs to. Ctrl+S saves to that file when the scene came from one, and to the cloud when a cloud project is open. Without an account it always saves to a file. In Firefox and Safari the file is downloaded instead of saved in place.
Most browsers keep Ctrl+N for a new window; use File → New file there.
Templates
File → Templates… opens example scenes: a model already lit and set up, with states to try. A template opens as a new, unsaved scene; save it to a file or to the cloud to keep your own copy. Every template opens in Draft, with the standard samples and denoiser.
Settings from a PNG
A PNG saved with Embed the render settings can give its settings back. Drag it onto the viewport, or use Settings from PNG… in the Render tab, with the same model (or one with the same materials) loaded. The light, the camera and every material value come back. An HDRI or a texture that you opened from your own disk is not inside the PNG; library HDRIs and PBR materials are.
Default settings
The Default settings group at the end of the Render tab:
- Reset all puts every setting back to the lab's defaults.
- Load settings… reads a settings file (
.json) saved earlier. - Save as default writes the current settings to a file,
quince-render-defaults.json. It is meant for setting up the lab itself: the lab reads that file when it starts. - Factory reset goes back to the values built into the lab.
Materials are not part of these settings, because they belong to a model.
Double-click any slider, or its number, to put just that one back to its default.
Undo and redo
Ctrl+Z undoes the last change and Ctrl+Shift+Z (or Ctrl+Y) redoes it: material edits, light and camera settings, a state you clicked, the dice. The arrows in the top bar do the same.
Projects and sharing
Sign in to keep projects in the cloud, open them on any computer, collect their renders in a gallery, work on them with teammates and share renders with a link. Everything else in the lab works without an account.
Signing in
Press Sign in at the right of the top bar and choose Continue with Google, or type your email address for a sign-in link (no password needed). Anybody can make an account this way: there is nothing to apply for. The email link also confirms that the address is yours. After you press Email me a sign-in link the same window says Check your inbox and shows the address; Resend link unlocks after 60 seconds, and Use a different email goes back to the form with the address filled in. × or Esc closes the window.
Cloud projects
The account menu (your name at the right of the top bar) has:
| Item | What it does |
|---|---|
| My projects | Your projects and the ones shared with you, with thumbnails |
| Save to Cloud (Ctrl+S) | Saves the scene to its project, or asks for a name the first time |
| Save to Cloud as… | Saves it as a new project |
| Renders of this project | The render gallery of the open project |
| Restore previous save… | Opens the save before the last one, if the last save went wrong |
| Sign out | Signs out of this browser |
The Save to cloud window (first save, or Save to Cloud as…) shows the current render with the project name, how many states and materials it holds and the model file. The name field is selected when it opens, so typing replaces it; the default is the model's file name. Enter saves, Esc or × closes it. While it saves the card shows the upload ("Uploading project" with the megabytes sent); if you close the window the upload goes on in the background and the status under the scene name shows it. When it is done a message at the bottom says Saved to cloud, with Open My projects.
The line under the scene name tells where things stand: Unsaved changes (with the time of the last change, and a Save button), Saving…, or Saved to cloud with how long ago. A scene that is saved only to a file says Saved to file. To rename the project, click the pencil next to its name or double-click the name; type the new name and press Enter (Esc keeps the old one).
A cloud project keeps the same things as a project file: the model, material edits and textures, light, camera, states and render settings. The model is uploaded with the first save; later saves keep it and update the rest.
In My projects you can open a project, rename it (the pencil on its card), see its Renders, Share… it with teammates, or delete it with the ×. Projects shared with you are marked Shared.
Autosave
While a cloud project is open, the lab saves your changes in the background about 30 seconds after you stop working, as an autosave. The autosave is kept apart: the project itself changes only when you press Save to Cloud. If you close the browser without saving, the next time you open the project the lab offers the autosaved changes, or the version you saved last.
The render gallery
In the Save PNG window, Save to project adds the picture to the open project's gallery. Open the gallery from Renders of this project or from My projects. Click a render to see it full size; the arrows (or the left and right arrow keys) go to the next one. Point at a render to get three buttons on it:
- Download saves the PNG.
- Share this render opens the link of that render.
- ⋯ has Use as thumbnail, Share this render, Download PNG and Delete render.
A Thumbnail mark shows which render is the picture of the project (in My projects and in templates); a Shared mark shows renders that have a link. Auto thumbnail (top of the gallery) keeps the newest render as the thumbnail. Choosing Use as thumbnail on a render turns it off. The choice is kept in this browser.
Delete render deletes at once; Undo in the message at the bottom brings it back for 6 seconds.
Share gallery (top right) opens the link of the whole project: one link to every render, including the ones you add later. A green dot on the button means that link is on.
Share links
A share link opens a simple page with the render (or the whole gallery) that anyone with the link can see and download, without an account. It does not give access to the project, the model or anything else.
- The Public link switch makes the link or removes it. Switched off, the link stops working at once.
- Copy puts it on the clipboard (the button says Copied for two seconds); the arrow button opens the page in a new tab.
Working with teammates
Share… on a project in My projects adds people by their email address:
- Can edit: they open the project, change it, save it and render.
- Can view: they open it read-only and see it and its renders.
They also need an account (signing in is enough). Only one person edits a project at a time: while someone has it open, the others see it read-only, with their name shown. It becomes free when they close it or have been idle for a while; Edit this project… in the account menu then loads the latest version and takes over. Only the owner can delete a project, share it or publish links.
Your account
Click your email address at the bottom of the account menu for the account settings:
- Plan and Cloud storage: how much of your space the projects and renders use, and how many projects you have of the number your plan allows. The bar turns orange near the limit and red when it is full. The Free and Pro limits are listed side by side, and Request Pro sends us an email.
- Change email (for accounts that sign in by email; a Google account's address is changed at Google).
- Sign-in: the address you sign in with.
- Delete account: press Delete…, type your email address to confirm, then Delete account. It removes the account with all its projects, renders, files and share links. It cannot be undone. Projects you saved as files on your computer are not affected.
Publish as template (admins)
Save as template… in the ⋯ menu of a project in My projects (shown to administrators) opens Publish as template. Fill in the Title, a Description (up to 140 characters) and a Credit or license (needed when the model is not yours). The card on the right shows how it will look in File → Templates. The template is a snapshot of the last saved version; if the open project has unsaved changes, a note says so and Save first saves them. When it is published, View in the message opens Templates.
Phone and app
On a phone
A phone cannot run the path tracer, so on a phone the lab opens a viewer instead of the 3D studio. It is for looking at what you made on a computer:
- My projects: sign in to see your cloud projects. Open one to see its saved renders and states. Tap a render to see it full size; Save offers the phone's own share menu (save to Photos, send in a message) or a download.
- Open .qproj file… shows the preview and the saved states of a project file on the phone. The file is read on the phone and not uploaded.
- Help: the button at the top right opens this user guide, so you can read and learn on the phone.
- Account: tap the round button with your initial for your plan and cloud storage, Sign out, and the Privacy and Terms pages. Delete account… is a separate step at the bottom.
The phone's back gesture closes a picture that is open full size.
Install as an app
In Chrome and Edge the lab can be installed like an app: it then opens in a window of its own, without the address bar and tabs, with an icon on the desktop and the taskbar.
Choose File → Install as app…, or click the install icon at the right of the address bar. The installed lab is the same lab, with the same account and files. A web page cannot switch to full screen by itself; in the app window press F11, or the full-screen button in the top bar, for the whole screen.
The full-screen button in the top bar makes the lab fill the screen in any browser; Esc leaves it.
Keyboard and mouse
Keyboard
| Keys | What they do |
|---|---|
| Ctrl+Z | Undo |
| Ctrl+Shift+Z or Ctrl+Y | Redo |
| Ctrl+S | Save: to the cloud project that is open, else to the project file |
| Ctrl+Shift+S | Save to file as… |
| Ctrl+O | Open a project file |
| Ctrl+N | New file (where the browser lets the page have it) |
| G | Show or hide the guides (rule of thirds) |
| H | Frame model: bring the whole product back into view |
| Space | Play or pause the animation (when the model has one) |
| Tab | Hide the panels, the states and the shelves, so the render has the whole window. Tab again brings them back |
| Esc | Leave full screen, close a window |
| F1 | This guide |
On a Mac use ⌘ Cmd instead of Ctrl.
Mouse
| Mouse | What it does |
|---|---|
| Left drag in the viewport | Turn around the product |
| Wheel | Come closer or go back |
| Right drag | Move the view sideways |
| Click on the model | Select the material of that part |
| Shift + click | Add a part to the selection |
| Shift + drag a slider | Fine adjustment: the slider moves ten times slower (press or let go of Shift at any moment of the drag) |
| Ctrl + wheel | Magnify the picture without moving the camera |
| Double-click a slider or its number | Back to its default |
| Double-click a material name | Rename it |
| Drag a material onto a part | Use that material there |
| Drop a file on the viewport | Open a model, a project file (.qproj), an HDRI (.hdr, .exr), or a PNG with embedded settings |
| Drop a picture on a texture slot | Use it as that map (Textures tab) |
Troubleshooting
The first render takes a long time to start
The first time the render starts, the lab compiles the path tracing program for your graphics card. Depending on the card and its driver this takes from a few seconds to a minute or more; the viewport counts the seconds. It happens once per visit. Keeping your graphics driver up to date can make it faster.
The lab or the whole computer stutters while rendering
The render keeps the graphics card busy. Close other heavy programs and tabs. Working in Draft and switching off Render (top bar) while you set up the shot helps too.
The lab runs on the slower graphics card
Laptops often have two graphics cards, and Windows may give the browser the slower, built-in one. In the Render tab, GPU shows the card the lab is running on. To change it, open Settings → System → Display → Graphics in Windows, choose Chrome or Edge, set it to High performance, and restart the browser.
Black dots, or glass and liquids look dark
Light has run out of bounces before it got through. Raise Glass bounces (8 to 12 for bottles and glassware) and, for deep or closed shapes, Bounces, in the Render tab.
Single very bright dots
These "fireflies" come from small, very bright reflections. Raise the Firefly filter a little, render more samples, or let the denoiser clean them.
The picture is still grainy, or the denoised one looks smeared
Render more samples: the denoiser can only clean what the render has already worked out. Keep Albedo + normals on, and try Balanced quality in the Denoiser group. Glass and very dark areas need the most samples.
The model lies on its side, or it is tiny or huge
CAD files are often drawn seen from above: use Tip forward 90° or Tip sideways 90° in the Model tab. Every model is scaled to 30 cm automatically; if the view is off, press Frame model.
Textures look stretched or smeared
The model has no usable texture coordinates, which is common with CAD files. In the Textures tab, choose a projection under Unwrap: Box for most shapes, Cylindrical for bottles and cans. Set Tile size to the size of the pattern.
The output size was lowered
The lab renders at most about 13 megapixels, which is more than 4K (3840 × 2160) but less than 5K or 8K at 16:9. A bigger size is lowered to fit, and the Render tab says so under Output size.
The page says WebGPU is not available
The lab renders with WebGPU. Use a current Chrome or Edge, and make sure hardware acceleration is switched on in the browser's settings. Safari 26 and Firefox may work too, depending on the computer and the graphics card; very old graphics cards have no WebGPU at all.
I lost my changes
- Ctrl+Z undoes changes, also a state you clicked by mistake.
- Clicking a state keeps the look you had as the Unsaved state at the top of the States list.
- In a cloud project, the autosave keeps changes made after the last save; open the project again and choose the autosaved changes.
Cloud: cannot sign in, or "storage is full"
Anybody can sign in with Google or an email link. If the email link does not arrive, check the spam or promotions folder and ask for a new one (Resend link, after 60 seconds), or use Continue with Google. If the menu still says the address is not approved, the lab has been closed to a list of people for now: write to us, or keep your work in project files (File → Save to file). When your cloud storage is full, delete a project or renders you no longer need, or keep new work as a file. The account settings show how much space is used.
On my phone I only see my renders
That is on purpose: a phone cannot run the path tracer, so it shows a viewer for your projects, renders and project files. Open the lab on a computer to render.
Still stuck?
Ask on our Discord (the Discord button in the top bar) or write to contact@quincemedia.com.
Nothing in the guide matches that.